Modding Documentation for Sexting my GF
Hey there, future mod creator! 💕 Welcome to the complete modding guide for Sexting my GF! This documentation has everything you need to bring your stories to life.
What you can create
- 💬 Custom conversation stories with branching narratives
- 👥 New characters with unique personalities and backstories
- 📸 Interactive image sharing just like the base game
- ⚡ Complex choice systems
- 📖 Side stories that interrupt main conversations
- 🎭 Whatever your (perverted) imagination can dream up! hehehe
🔧 Work in progress
TheGram, and Skipr will get modding support later.
Installing Mods
Want to try out some mods before creating your own? Open the Mods app on the phone and choose your method:
🌐 Method 1: Download from URL (Recommended)
- Get a .zip file URL from Discord or other sources
- Click the green Install button in the Mods app
- Paste the URL and click "Download Mod"
- Once downloaded, click "Load" and you're ready!
👆 Visual guide showing the installation process
Note: URLs must point to .zip files. The game includes security protection against malicious files.
📁 Method 2: Drag & Drop
- Click the blue folder button to open the Mods folder
- Drag your mod folder into the Mods folder
- Refresh and load the mod - no installation needed!
⚠️ Good to Know
Mods completely replace the base game - you're playing an entirely different experience with separate saves. Only install from trusted authors. To return to the base game, restart completely.
Okay okay, enough playing around! Time to start working on your own spicy stories! ✨
Requirements
Before you start modding, you'll need:
- Basic text editing - VS Code or Cursor recommended for the best experience (And get the Ink extension for VS Code)
- Ink language knowledge - Learn from the resources below
- Image editing software - For creating character images and scenes
- Twin Problems example mod - Comes with the game and is highly recommended to study!
Quick Setup
Follow these steps to create your first mod:
Study Twin Problems
The game comes with a complete example mod called "Twin Problems" - study it first! It shows all features in action and is the perfect starting point.
Set up your mod structure
The easiest way is to copy the entire Twin Problems folder and rename it to your mod name. This gives you the perfect starting structure with all the required folders (Characters, Conversations, Images) and example files you can modify.
Configure your mod
Create or edit the mod.json file with your mod information. If you copied Twin Problems, just update the existing mod.json with your details. If starting from scratch, create a new mod.json following the format below.
Test & Validate
Load your mod in-game and use the validation button to check for errors. Use the reload button to quickly test changes without restarting the game. Start small and build up your story gradually!
Folder Structure
Every mod must follow this exact folder structure. You'll need to create these folders manually (or copy the Twin Problems folder and rename it to your mod name):
Your Mod Name/
├── mod.json                    // Mod configuration
├── Characters/                 // Character definitions
│   ├── character1.json
│   └── character2.json
├── Conversations/              // Story conversations
│   ├── My Cool Story/          // Name folders whatever you want!
│   │   ├── story1-1.ink
│   │   ├── story1-1-settings.json
│   │   └── Side Stories/       // Optional side stories
│   │       ├── sidestory1.ink
│   │       └── sidestory1-settings.json
│   └── The Ending/             // Full creative freedom!
├── Injections/                 // Injectable conversations (optional)
│   └── Chapter1/               // Organize by chapters/themes
│     ├── injection1.ink
│     ├── injection1.json
│     ├── injection2.ink
│     └── injection2.json
│
└── Images/                     // All images for your mod
    ├── character1.png
    ├── scene1.png
└── header.png // Mod banner image• ✅ Conversations:
.ink format
• ✅ Characters:
.json format
• ✅ Settings:
.json format
Mod Configuration
The mod.json file contains essential information about your mod:
{
    "modId": "your-unique-mod-id",
    "modName": "Your Mod Display Name",
    "version": "1.0.0",
    "author": "Your Name",
    "description": "A brief description of your mod story",
    "headerImage": "header.png"
}
Parameters (all required)
| Parameter | Description |
|---|---|
modId |
Unique identifier for your mod (lowercase, no spaces) |
modName |
Display name shown in the game |
version |
Your mod version (use semantic versioning) |
author |
Your name or handle |
description |
Brief description of your mod |
headerImage |
Banner image filename (1600x400 recommended) - Optional |
Characters
Characters are defined in JSON files within the Characters folder. Each character needs their own file:
{
    "isMainCharacter": false,
    "contactID": "character_id",
    "contactName": "Character Name",
    "contactNickname": "Nickname",
    "contactNicknameShort": "Nick",
    "profilePicturePath": "character.png"
}
Character properties
| Property | Description | Example |
|---|---|---|
isMainCharacter |
Set to true for the player character (only one allowed) | false |
contactID |
Unique ID used in conversations (don't change after creation) | "sarah" |
contactName |
Full name of the character | "Sarah Johnson" |
contactNickname |
How they appear in conversations | "Sarah" |
contactNicknameShort |
Short version for UI elements | "Sarah" |
profilePicturePath |
Image filename (832x832 recommended) | "sarah.png" |
Conversations
Conversations are the heart of your mod. They're written in the Ink language and control the story flow. The Twin Problems mod that comes with the game is your best teacher here - seriously, check it out!
Basic conversation structure
EXTERNAL GetStoryFlag(flagName)
EXTERNAL SetStoryFlag(flagName)
EXTERNAL RemoveStoryFlag(flagName)

-> start

== start
Hey there! How's your day going?

* Good, thanks for asking!
    -> good_response
* Pretty terrible honestly
    -> bad_response

== good_response
That's great to hear!
-> END

== bad_response
Oh no, what happened?
-> END
Ink Language Basics
Here are the essential Ink concepts you need to know:
Knots
Sections of your story marked with == knot_name
== my_story_section
This is a knot!
Choices
Player options marked with *
* Choice 1
* Choice 2
Diverts
Navigate between knots with -> knot_name
-> next_sectionEnd
Finish conversations with -> END
-> ENDChoice System
The game supports several special choice types:
🔴 Important Choices
Add an exclamation mark to highlight those *really* important decisions (you know the ones 😉):
* !This is a very important choice
    -> important_consequence
Shows a red exclamation mark next to the choice in-game.
👤 Action Choices
Choices that don't appear as messages (wrapped in %):
* %Don't send the photo%
    -> no_photo_sent
Perfect for internal actions or decisions.
💬 Suppressed Choices
When the choice text differs from what's actually sent (minimum 4 characters between <>):
* <Surely> Yes I know for sure
    -> confident_response
Player sees "Surely" but sends "Yes I know for sure".
💖 Route Choices
Add route indicators to important choices to show players what type of content they're choosing. This only works with important choices (those with exclamation marks !):
* !(love) This choice is for the love route
    -> romantic_path
* !(ntr) This choice is netorare focused
    -> ntr_path
* !(ntrs) This choice is netorase focused
    -> ntrs_path
Route indicators:
- (love) - Love route focused - shows 💘 heart emoji
- (ntr) - Netorare focused - shows 😈 smiling purple devil emoji
- (ntrs) - Netorase focused - shows 😘 kissing emoji
You can also combine routes:
* !(ntrs,love) This choice is both NTRS and Love focused
    -> combined_path
Route choices work with suppressed choices too!
* !(ntrs, love) <HELP ME> Heyy, just chilling at uni. You okay?
    -> logan_greeting
* !(ntr) What do you want now, Logan?
    -> logan_greeting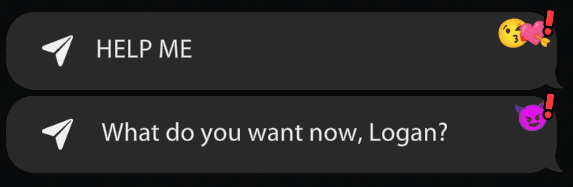
👆 Visual example showing how route choices appear in-game
Functions
Functions are special commands you can use anywhere in your conversations to make the game do things that ink doesn't support natively.
EXTERNAL before you can use them!
<wait> commands before them! So ShowCustomTransition might fire sooner than you expect. Structure your knots accordingly!
Available functions
Flag functions
EXTERNAL GetStoryFlag(flagName)
EXTERNAL SetStoryFlag(flagName)
EXTERNAL RemoveStoryFlag(flagName)
Manage player choices and story state
Transition function
EXTERNAL ShowCustomTransition(title, subtitle)Create chapter-like transitions, can also be used to create time jumps.
For example ShowCustomTransition("Time passed...", "Two weeks later").
Contact modification functions
EXTERNAL SetContactDescription(contactId, newDescription)
EXTERNAL SetContactPersonality(contactId, newPersonality)
EXTERNAL SetContactHistory(contactId, newHistory)
Dynamically change contact information during conversations. First parameter is the contact ID, second is the replacement text.
System commands
EXTERNAL RunCommand(command)Execute system commands. Use ~ RunCommand("install-injector") to enable InjectorOS functionality.
Example usage
EXTERNAL GetStoryFlag(flagName)
EXTERNAL SetStoryFlag(flagName)
EXTERNAL ShowCustomTransition(title, subtitle)
EXTERNAL SetContactDescription(contactId, newDescription)
EXTERNAL RunCommand(command)

-> start

== start
{
    - GetStoryFlag("sarah_angry"):
        She's still mad at you...
        -> angry_path
    - else:
        We talked it out and...
        -> transition_to_makeup
}

== transition_to_makeup
~ ShowCustomTransition("Chapter 2", "Making up")
Hey there! 😊
~ SetStoryFlag("made_up_with_sarah")
~ SetContactDescription("sarah", "Your loving girlfriend ❤️")
-> END

== contact_blocked
~ SetContactDescription("dion", "Contact blocked")
~ SetContactPersonality("dion", "Contact blocked")
~ SetContactHistory("dion", "Contact blocked")
This person has been blocked.
-> END
Notice how the transition is in its own knot so it fires at the right moment! Contact modifications happen instantly when called.
Flags & State Management
Flags let you track player choices and create branching storylines:
Setting flags
~ SetStoryFlag("player_chose_honesty")Mark that the player made a specific choice.
Checking flags
{
    - GetStoryFlag("player_chose_honesty"):
        I remember you value honesty
        -> honest_path
    - else:
        -> default_path
}
React differently based on previous choices.
Multiple flag check
{
    - GetStoryFlag("sarah_angry"):
        She's still mad at you
        -> angry_sarah
    - GetStoryFlag("sarah_happy"):
        She seems in a good mood
        -> happy_sarah
    - else:
        She seems neutral
        -> neutral_sarah
}
Handle multiple relationship states.
Removing flags
~ RemoveStoryFlag("temporary_flag")Clear flags when they're no longer needed.
Special Messages
The game provides custom commands to enhance your storytelling:
Images
Images are automatically imported based on their filenames in the Images folder.
Recommended image sizes
Chat images
832 x 1216 pixels
Vertical images sent in conversations
Profile pictures
832 x 832 pixels
Square images for character profiles
Mod banner
1600 x 400 pixels
Header image for your mod
sarah-at-beach.png not sarah at beach.png
Conversation Settings
Every .ink file needs a corresponding -settings.json file to control timing and flow:
{
    "storyId": "sarah-chat-1",
    "contactID": "sarah",
    "nextStoryId": "sarah-chat-2",
    "isStartingStory": true,
    "forceTimeInHours": 14,
    "passTimeInMinutes": 30,
    "timeIsExact": false,
    "forceDay": 0,
    "isSideStory": false
}
Settings parameters
| Parameter | Description | Example |
|---|---|---|
storyId |
Unique identifier for this conversation | "sarah-chat-1" |
contactID |
Which character this conversation is with | "sarah" |
nextStoryId |
ID of the next conversation in sequence | "sarah-chat-2" |
isStartingStory |
Is this the first conversation in your mod? | true |
forceTimeInHours |
What time this conversation happens (24-hour) | 14 (2 PM) |
passTimeInMinutes |
Additional time to pass | 30 |
timeIsExact |
Go to exact time vs. relative time | false |
forceDay |
Set specific day (0=None, 1=Monday, etc.) | 0 |
isSideStory |
Can be triggered as a side story | false |
Side Stories
Side stories are conversations that interrupt the main flow and then return to where they left off:
Creating a side story
Create the side story files
Create your .ink file and settings file in a "Side Stories" subfolder
Mark as side story
{
    "storyId": "ben-interruption",
    "contactID": "ben",
    "isSideStory": true
}Trigger from main story
<side-story-ben-interruption>Example use case
You're having a romantic conversation with Sarah when Ben suddenly texts asking for help. The side story handles Ben's interruption, then returns to your conversation with Sarah exactly where you left off.
Injections System
Injections are a feature that allows you to simulate hacked conversations that can be triggered from anywhere in your mod using the InjectorOS app.
What are injections?
Injections simulate conversations between any two characters in your mod. They're perfect for:
- 📱 Background conversations happening between characters
- 🎭 Dramatic reveals or cheating
Setting up injections
Enable InjectorOS
By default, InjectorOS is disabled. Enable it in your conversation:
EXTERNAL RunCommand(command)

~ RunCommand("install-injector")Create the Injections folder
Create an "Injections" folder next to your Characters, Conversations, and Images folders. You can organize with subfolders however you like.
Create injection files
Each injection needs two files with the same name:
injection-name.ink- The conversation contentinjection-name.json- The injection configuration
Trigger the injection
Use the inject command in any conversation:
<inject-injectionId>Example use:
<inject-dion-helly-leak>Injection configuration
The JSON file controls how the injection works:
{
    "injectionId": "dion-helly-leak",
    "conversationsToReceive": [
        {
            "contactId": "helly",
            "senderId": "dion",
            "inkFilePath": "dion-helly-leak.ink"
        }
    ]
}
Injection parameters
| Parameter | Description | Example |
|---|---|---|
injectionId |
Unique ID used to trigger this injection | "secret-reveal" |
contactId |
The person receiving the messages | "sarah" |
senderId |
The person sending the messages | "ben" |
inkFilePath |
Filename of the .ink file (must be next to the .json file) | "secret-reveal.ink" |
Writing injection conversations
Injection .ink files work just like regular conversations, but with important restrictions:
✅ What works
- Regular text messages
- Image sharing
- Wait commands
- Flags for branching logic
- Special message commands
⚠️ Limitations
- Only ONE choice per knot
- InjectorOS always picks the first choice
- Can't use multiple choices for user interaction
- Must be linear conversation flow
Complete injection example
📄 Injections/Chapter1/secret-reveal.json
{
    "injectionId": "secret-reveal",
    "conversationsToReceive": [
        {
            "contactId": "sarah",
            "senderId": "ben",
            "inkFilePath": "secret-reveal.ink"
        }
    ]
}
📄 Injections/Chapter1/secret-reveal.ink
EXTERNAL GetStoryFlag(flagName)
EXTERNAL SetStoryFlag(flagName)

-> start

== start
{
    - GetStoryFlag("player_knows_secret"):
        I think it's time you knew the truth about what happened...
        -> reveal_truth
    - else:
        Hey Sarah, we need to talk about something important.
        -> gentle_approach
}

== reveal_truth
<wait-3>
I saw what happened at the party last night.
~ SetStoryFlag("ben_revealed_secret")
* What did you saw...?
    -> dramatic_moment

== gentle_approach
I hope you're ready for this...
<wait-2>
* What?
    -> reveal_truth

== dramatic_moment
<wait-5>
<ben-evidence-photo>
This changes everything, doesn't it?
* 😳😭
    -> END
📄 Triggering the injection
// In any regular conversation:
Something big is about to happen...
<inject-secret-reveal>
// Injection plays in InjectorOS
Now that you've seen that, what do you think?Time Management
Control when conversations happen to create realistic pacing:
forceTimeInHours to the time you want your conversation to happen. The passTimeInMinutes is just for the minute of the day (yeah, bad dev naming conventions haha 😅).
Morning conversation
{
    "forceTimeInHours": 8,
    "passTimeInMinutes": 30,
    "timeIsExact": true
}
Conversation happens exactly at 8:30 AM
Afternoon chat
{
    "forceTimeInHours": 14,
    "passTimeInMinutes": 15,
    "timeIsExact": true
}
Conversation happens at 2:15 PM
Evening on friday
{
    "forceDay": 5,
    "forceTimeInHours": 19,
    "passTimeInMinutes": 0,
    "timeIsExact": true
}
Friday at 7:00 PM
Day values
0 = None, 1 = Monday, 2 = Tuesday, 3 = Wednesday, 4 = Thursday, 5 = Friday, 6 = Saturday, 7 = Sunday
Testing & Validation
Ensure your mod works perfectly before sharing:
Testing checklist
Need Help? 🆘
Stuck on something? Here's how to get help:
- 💬 Contact @unzippedgames on Discord (I'm pretty active!)
- 🛡️ Reach out to any of our awesome moderators
- 📁 Share your mod files for debugging help - we love helping!
- 🤝 The community is always willing to help others
Complete Example
Here's a complete simple mod to demonstrate all concepts:
📄 mod.json
{
    "modId": "first-date",
    "modName": "First Date",
    "version": "1.0.0",
    "author": "Your Name",
    "description": "A sweet story about a first date",
    "headerImage": "header.png"
}
📄 Characters/emma.json
{
    "isMainCharacter": false,
    "contactID": "emma",
    "contactName": "Emma",
    "contactNickname": "Emma",
    "contactNicknameShort": "Emma",
    "profilePicturePath": "emma.png"
}
📄 Conversations/Chapter1/first-conversation.ink
EXTERNAL GetStoryFlag(flagName)
EXTERNAL SetStoryFlag(flagName)
EXTERNAL RemoveStoryFlag(flagName)

-> start

== start
Hey! I had such a great time on our date yesterday 😊

* It was amazing! I'd love to see you again
    ~ SetStoryFlag("wants_second_date")
    -> positive_response
* It was nice, but I think we should just be friends
    ~ SetStoryFlag("just_friends")
    -> friend_zone

== positive_response
Really? I was hoping you'd say that!
<wait-2>
Would you like to go out again this weekend?

* !Absolutely! I'd love to
    Perfect! I'll plan something special
    -> END

== friend_zone
Oh... okay, I understand.
<wait-3>
Friends it is then!

* Thanks for understanding
    Of course. Take care!
    -> END
📄 Conversations/Chapter1/first-conversation-settings.json
{
    "storyId": "first-conversation",
    "contactID": "emma",
    "nextStoryId": null,
    "isStartingStory": true,
    "forceTimeInHours": 10,
    "passTimeInMinutes": 0,
    "timeIsExact": true,
    "forceDay": 6,
    "isSideStory": false
}